
It’s highly possible that you need an enabled query folding, but this option is disabled for your table in Power BI. Let’s see how to resolve it.
Why We need to Enable Query Folding?
You may need to enable query folding for different reasons. For example, to apply the incremental refresh, to use direct query or dual mode, or to optimize performance. But it is highly possible that query folding is not active for the table you imported in Power BI.
At first, it’s good to know what Query folding is. Microsoft defines it as:
“Query folding is the ability for a Power Query query to generate a single query statement to retrieve and transform source data.”
Actually, when the query folding is enabled, you can see all the steps you applied in Power Query as a SQL statement that can be interpreted and executed by your data source.
Most data sources have the concept of a query language that supports query folding. These data sources can include relational databases, OData feeds (including SharePoint lists), Exchange, and Active Directory. However, data sources like flat files, blobs, and web typically do not.
So, Let’s see what’s the solution to enable Query folding if you see it’s disabled.
How to Enable Query Folding?
Consider that we have a simple report like this and I want to apply incremental refresh on our fact sales table.
We’re not focusing on incremental refresh on this blog, and if you like to learn how to do it you can watch the related video in YouTube channel.
But to set up the incremental refresh it is required to check if the Native Query Folding is enable.
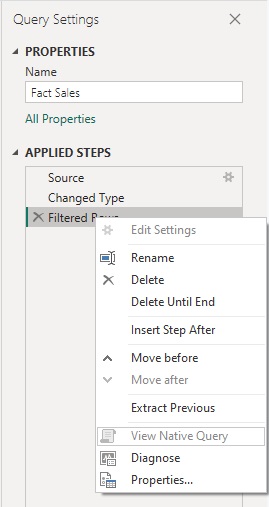
It’s easy to check. Here, if I right click on the last step, you can see Native Query option is grayed out. It means, it’s disable.
Change M Power Query code
So, what we should do is select the table first, and then from Home tab, select Advanced Editor.

As you can see here, this M Power Query code shows us how we created this fact sales table. If you’re familiar with M Power Query, you can see each step in a line. For example, you can see the source here and the columns selected from our SQL table. Then the filter we applied on this table. And if we add any new step, you can find a new line of code here. And at the end, you can see the last step will be returned as the result.

Now, The first thing I’m going to do is formatting these codes to become more readable for you. I just bring some codes into the next lines and use indentation for better visibility, and then you can understand easily what I’m going to do to change the query folding.
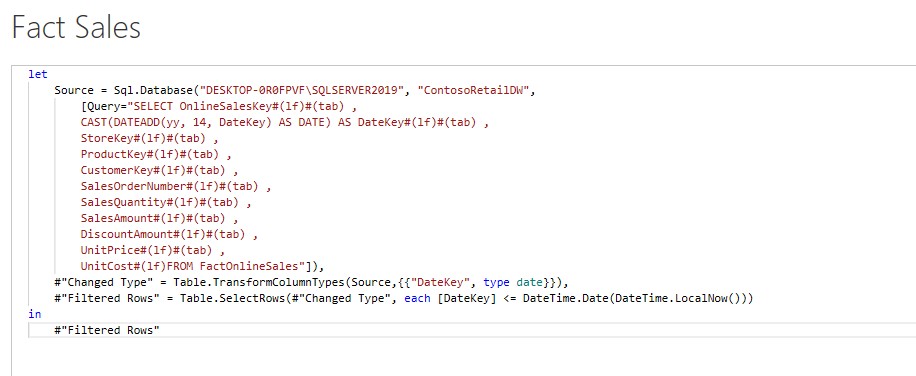
Now, if I press on Done, you can see the code is the same as before, I just formatted it. OK, I open the Advanced Editor again and start from the source. I add a close parenthesis at the end of this line before the comma. Because at the end of each step we should put a comma and then go to next step.

Then, in the next line I define a new step. I’m choosing a name for it but you can choose anything you like.
For example, here I write # and inside a double quotations write “Run Native Query”. And this step is equal to, and then I should add a function in M language which is Value.NativeQuery and open parenthesis.
Be careful that M Power Query is a case sensitive language. So, write exactly the same as I write.
Then, the first thing I should define is where the data for this step is coming from. As you know, the data is coming from the previous step. And the previous step name is Source. So, I write Source and add a comma and go to the next line.

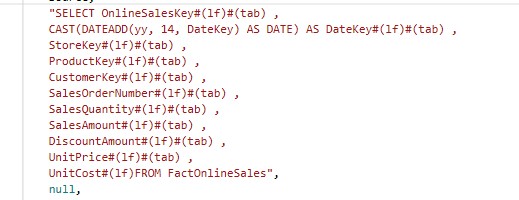
Here I have to use the select statement for the columns we’re going to use. So, here I just remove the square bracket from the beginning and remove everything up to where our select statement begins.
Now, I go to the end of the select statement, remove the square bracket, put a comma and go to the next line.
Then we write null here and a comma and next line.
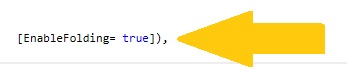
In this line, I want to define the query folding. So, open and close square brackets, and inside, write EnableFolding is equal to, and here is where we can define if it should be enabled or disabled.
If I write true, then the query folding will be enabled, and if I write false it will be disabled. So, here I write true. And at the end, you can see close parenthesis and comma, and then we go to the next step.
We don’t want to apply any changes to the next steps but just one small change.
Previously, this step got its data from Source step. But now we added a new step “Run Native Query” and it should be where this filter rows step get its data from.
So, I just copy the step name we want to get the data from, and go to this line, and here, remove Source and past “Run Native Query” instead.

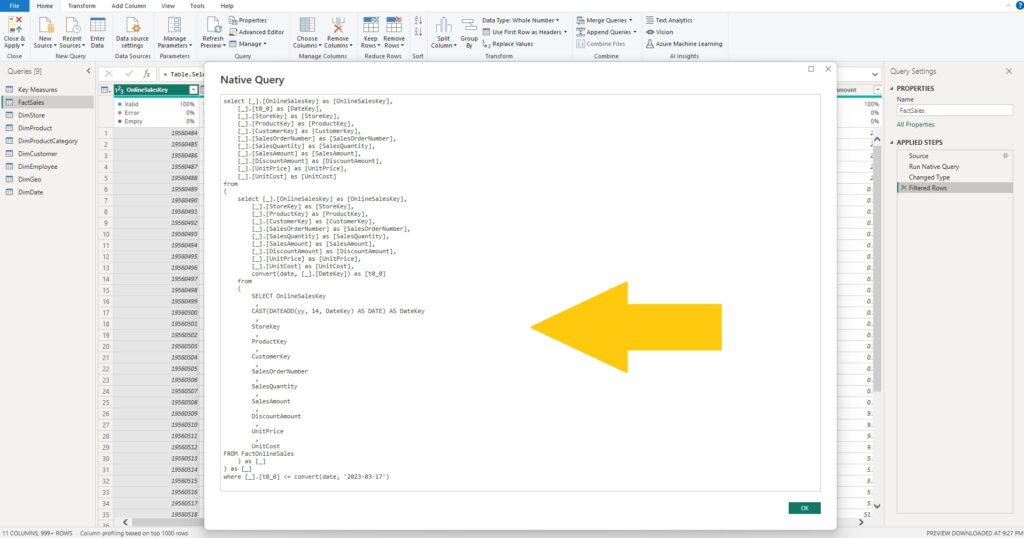
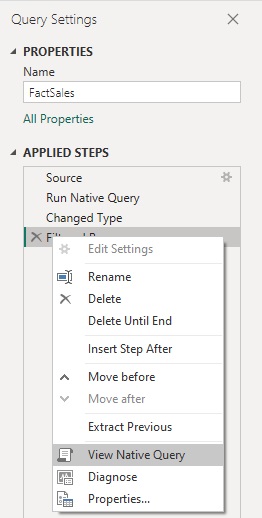
And so, now if I right click on the last step here, you can see Native Query is now active and if I click on it, you can see all these steps we performed in Power Query, in a form of SQL code which can be used in our SQL Database.


So, Done and dusted!
This is how easily you can enable any disabled query folding table. Just become sure that your source data is coming from somewhere that supports query folding like a SQL database, not a flat file.
Final Word
It would be so great to comment your questions below this post and watch the related YouTube video on the channel for better understanding.